How to Create a Gallery Wall on a Staircase
A staircase wall is one of the trickiest gallery wall projects because the sightline changes as you walk up or down, which means the standard flat-wall gallery rules need an adjustment. The angle itself is what makes staircase galleries so visually striking once it’s done right.
Understand the Angled Sightline Before You Measure Anything
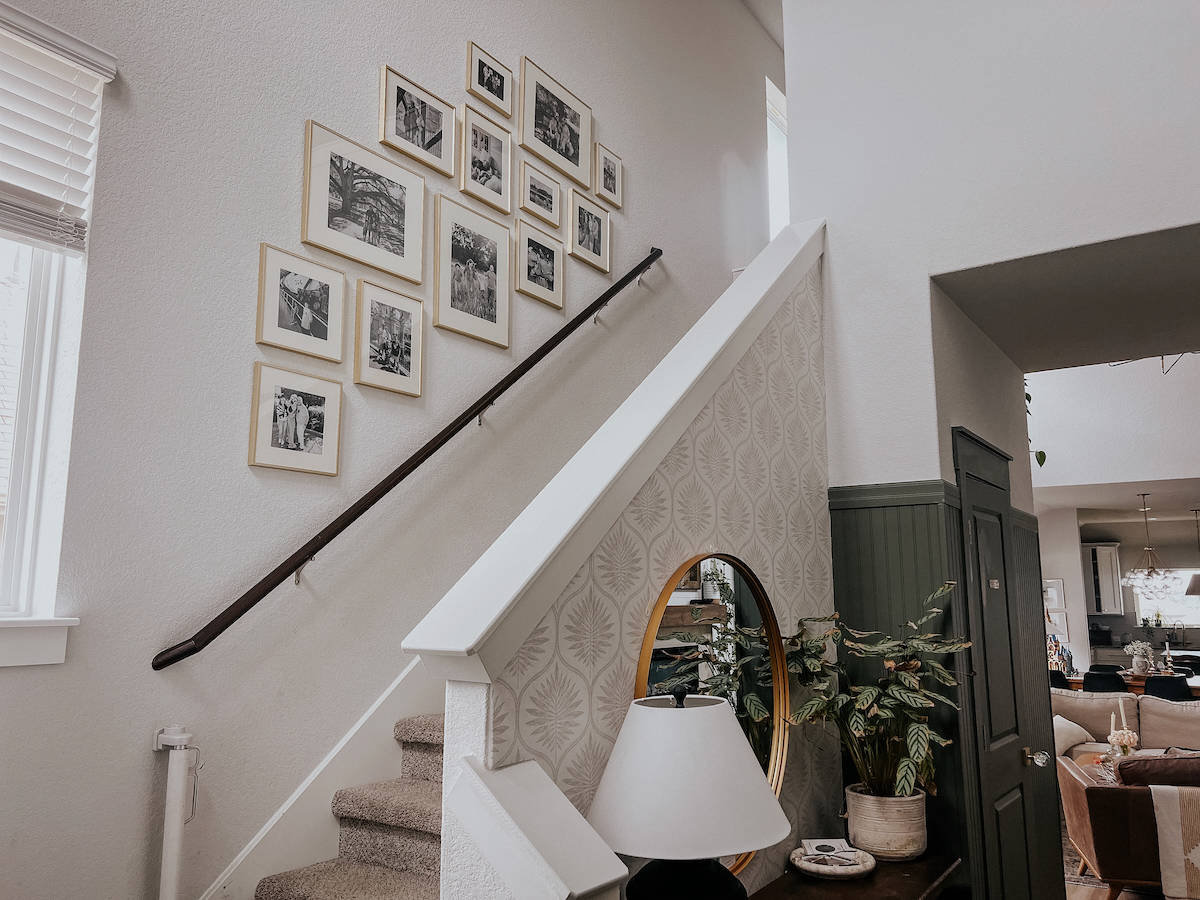
On a flat wall, every frame’s center sits at the same height. On a staircase, frames need to follow the angle of the stairs themselves, stepping up in a parallel line roughly 6 to 8 inches above the stair nosing’s rise, rather than all aligning to one horizontal center line the way a standard gallery wall would.
Walk up and down the stairs a few times while visualizing the layout before hanging anything. A gallery that looks correct when viewed from the bottom of the stairs can look off-kilter from partway up, so check the arrangement from multiple points along the staircase, not just the entry view.
Use the Stringer Line as Your Guide
The stringer, the angled structural line running alongside the staircase, is your reference line for spacing frames evenly as they climb. Measure the vertical rise between each stair step, then use that consistent measurement to offset each subsequent frame’s placement up the wall, keeping the same horizontal distance from the stringer for every single frame.
A laser level designed for angles, or simply a long, straight board held against the stringer line, helps confirm each frame is offset consistently before you commit to any nail holes.
Plan the Full Layout on the Floor First
| Step | What to Do | Why It Matters |
| 1 | Lay all frames out on a flat floor space in the planned arrangement | Lets you see spacing and balance before committing |
| 2 | Trace each frame onto kraft paper | Creates a reusable template for exact placement |
| 3 | Tape templates to the staircase wall along the stringer angle | Confirms the actual angled layout looks right in place |
| 4 | Adjust spacing gaps to be consistent, typically 2-3 inches | Prevents the uneven look common in DIY attempts |
| 5 | Hang frames directly over the paper templates | Ensures accurate placement without guesswork on the wall |
Mixing Frame Sizes on an Incline
A staircase gallery generally reads better with a mix of frame sizes rather than uniform ones, since the varying step heights naturally create visual movement that uniform frames can flatten out. Anchor the arrangement with one or two larger pieces, ideally near the bottom and top of the run, with smaller frames filling in the climb between them.
Keep a consistent frame color or material even while varying the sizes, since introducing frame color variation on top of an already dynamic angled layout can push the whole wall toward looking chaotic rather than curated.
Safety and Practical Hanging Considerations
Staircases involve hanging at height, often while standing on the stairs themselves rather than solid, flat ground, which makes a stable stepladder or an assistant holding the ladder steady a genuine safety requirement, not just a convenience. Never lean a ladder against the staircase railing itself for support; use a ladder rated and positioned for stair use, or work from the landing at the top and bottom where possible.
Use painter’s tape to mark exact hanging points before drilling or hammering anything at height, since correcting a mistake on a staircase wall (patching and repainting at an awkward angle, on a ladder) is considerably more frustrating than the same fix on a flat, ground-level wall.
What to Hang: Photos, Art, or a Mix
Family photos work particularly well on a staircase gallery since it’s a transitional space people pass through repeatedly rather than sit and study closely, making it a good spot for personal, sentimental content that might feel too casual for a formal living room wall. Mixing in a few pieces of art or a couple of mirrors among the photos breaks up a wall of uniform photo frames and adds visual variety without losing the personal, collected feeling.
If your staircase gets significant direct sunlight through a nearby window, UV-protective glass in the frames prevents photos and art from fading over the years, which matters more here than on an interior wall with less light exposure.
Handling a Two-Story Staircase or a Landing Turn
A staircase with a turn or a landing partway up breaks the single continuous stringer line into two or more separate angled runs. Treat each run as its own mini gallery with internally consistent spacing, then use the landing itself as a natural pause point, a good spot for a slightly larger anchor piece before the arrangement continues up the next flight at its own angle.
For very tall, two-story staircases, resist the urge to fill the entire wall top to bottom. Leaving some intentional negative space, particularly near the very top where sightlines from the ground floor become more difficult to appreciate anyway, keeps the gallery from feeling like an obligation to fill every available inch.
Maintaining the Gallery Over Time
A staircase gallery accumulates dust like any other wall-mounted display, but it’s easy to forget about specifically because it’s not a surface people touch or clean as routinely as a shelf or tabletop. A quick dusting pass every few months, using a duster with an extension pole for the higher frames near the top of the stairs, keeps the display looking as intentional as the day it went up.
As family photos accumulate over the years, plan for periodic rotation rather than only adding new frames indefinitely. Swapping older photos out for storage (or a separate album) as new ones come in keeps the gallery from becoming visually overcrowded over a decade of continuous additions.
Frame Hardware Specific to Angled Walls
Standard picture hangers work fine on a staircase wall’s structure itself, since the wall behind the angled stringer is still vertical, only the layout follows an angled line rather than the hardware needing anything specialized. That said, use two hanging points per frame rather than a single centered hook wherever possible, since frames on a staircase wall are more visible from multiple angles and a slight tilt is more noticeable here than on a flat wall viewed straight on.
For an especially long staircase run with many frames, a leveling tool with a bubble level built in, rather than relying on eye judgment alone, catches small tilts that become obvious once you’re a few steps up or down from where you originally checked the arrangement.
Alternatives to a Traditional Photo Gallery
For homeowners who want the visual impact of a staircase gallery without managing dozens of individual frames, a single oversized piece of art or a large decorative mirror mounted at the midpoint of the staircase run can achieve a similarly striking effect with far less ongoing arrangement and dusting. This works particularly well in modern homes where a more minimal, curated look fits the overall aesthetic better than a dense photo collection.
A large-scale wallpaper mural specifically designed for a staircase’s dimensions is another option growing in popularity, effectively replacing the gallery wall concept entirely with a single, cohesive visual statement rather than a collection of individual pieces.
Frequently Asked Questions
How do I space frames evenly on an angled staircase wall?
Use the staircase’s stringer line as your reference and keep a consistent horizontal offset from it for every frame, rather than aligning frames to one flat horizontal center line the way you would on a standard wall.
Should staircase gallery wall frames be the same size?
Mixing sizes generally looks better on an incline than uniform frames, since varying sizes complement the visual movement the angled stairs already create. Keeping a consistent frame color or material helps balance the size variation.
How high above each stair step should frames hang?
Roughly 6 to 8 inches above the stair nosing’s rise line, following the same angle as the staircase itself rather than a flat horizontal placement.
What’s the safest way to hang art high on a staircase?
Use a stepladder rated and positioned for stair use, or work from the top and bottom landings where possible. Never lean a ladder against the staircase railing itself for support, since it’s not designed to bear that load.
Should I use UV-protective glass for staircase gallery frames?
It’s worth it if the staircase gets direct sunlight through a nearby window, since UV exposure fades photos and art more over time in bright, sunlit stairwells than on a typical interior wall.
How do I handle a gallery wall on a staircase with a landing turn?
Treat each angled run of stairs as its own mini gallery with internally consistent spacing, and use the landing as a natural pause point for a slightly larger anchor piece before the arrangement continues at its next angle.
Is there an alternative to a full photo gallery on a staircase?
Yes. A single oversized piece of art, a large decorative mirror at the midpoint of the run, or a wallpaper mural designed for staircase dimensions can achieve a similarly striking effect with far less ongoing arrangement and dusting than a dense photo collection.
Final Thoughts
A staircase gallery wall succeeds when the layout respects the angle instead of fighting it. Plan the full arrangement on paper templates first, follow the stringer line for consistent spacing, and mix frame sizes while keeping the frame material consistent. Done this way, the incline becomes the wall’s best feature rather than its biggest obstacle.